How to make your first Open Source contribution on Github
Published on Mar 16 2022
Last updated on Apr 04 2022
Have you ever thought about contributing to an open source project on Github, maybe a repository owned by a big company like Apple? This might sound very intimidating and make you give up before even trying, which is why I wrote this step-by-step guide on how to make your first contribution (a.k.a your first pull request) to a project on GitHub.
Why contribute to open source?
There are many benefits, but here are some main ones:
It continues the free open-source software tradition! Free, high-quality software is the bedrock of much of modern tech. Your contributions, no matter how small, is proof that humans can collaborate in a decentralized way for a greater good.
It helps strengthen your GitHub portfolio as well as your resume if you are a beginner and do not have much past working experience.
The review process will get you feedback on the quality of your code which will make you a better programmer in the long run.
It builds popularity and extends your professional network within the programming community.
It's always good to give back to a project you use and you can help improve the community.
Getting started
First, you can choose one project on GitHub to contribute to (if you have an idea on what to add to the project). I have created this repository on my GitHub that you can use to practice with in case you don't have one in mind yet (Here's the link to the Github repository).
Generally, you would find an issue on any open-source project and fix that issue. You can also just edit their README (and other documentation). Here I have filed an example issue on my playground repository to demonstrate how you would fork this.
Below are 13 steps to make your first contribution, **NOTE: Steps 1- 6 you should only do once for each project you want to contribute to in order to correctly set up your working environment, and step 7-13 you should repeat for every contribution to a single project.
Here I will attempt to contribute to apple/password-manager-resources on Github. This project is for creators of password managers to create passwords that pass the password rules of every website. You can read more of their documentation to get a better understanding its purpose and how the project is used. I would suggest to make a change to a project's documentation, a.k.a their README.md.
Step 1: Fork the repository you want to contribution to

The fork button is visible on the landing page of the repository. After forking this repository, you will have a copy of the repository in your GitHub profile. The reason to fork the repository is because you will need to upload (a.k.a push) your changes to GitHub, but you can't upload your change directly to Apple's repository as their security rules prevent just anyone from uploading code or new branches.
Step 2: Copy the forked repository into your computer

After copying the HTTPS URL, paste the below command in your VSCode (or any other IDE) terminal:
git clone <URL_OF_FORKED_REPOSITORY>
For example, here I am using https://github.com/alissanguyen/password-manager-resources.git as <URL_OF_FORKED_REPOSITORY>.
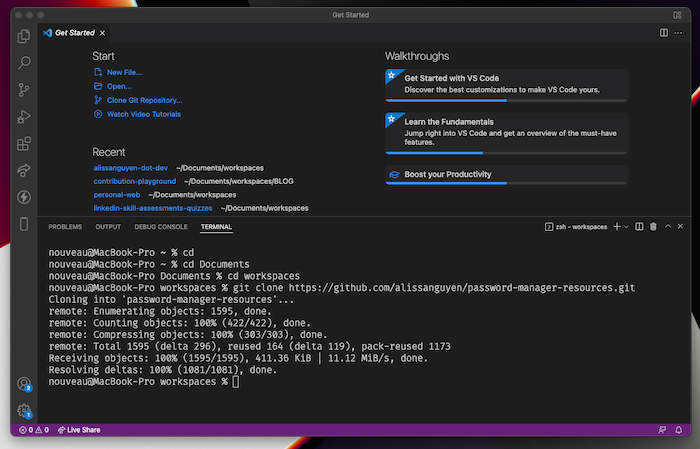
Step 3: Navigate to your local repository.
In this step, first, you need to find your local repository in your local workspace. After running the git clone command in step 2, you then will get an exact copy of the project in your local workspace folder. You can open it using the terminal command cd <name_of_workspace> or open a new window from your IDE then from there open your destination folder/repository.
Step 4: Make sure that your forked repository is the origin remote
This is done automatically if you've cloned the correct repository. But synchronizing between your local copy of the repository and your remote repository (forked on your GitHub profile) is important. The URLs pointing to repositories under your GitHub profile are called "remotes" and there are "origin remotes" and "upstream remotes". (Check out this article from Siva Natarajan to understand more about the difference between these two.)
When you cloned your forked repository using the HTTPS URL above, that should default your fork as the origin remote but you can use git remote -v to check your current remotes.

If you don't see the word "origin" next to the URL, you can add it using git remote add origin <HTTPS_URL_OF_FORKED>.
⭐️ Alert!
If you run into any problem during this step, check out the Set up Git documentation.
Step 5: Add the project you want to contribute to as the upstream remote
Click the "forked from" link under your forked repository on GitHub to navigate to the original project repository.

Then copy the HTTPS URL and in your IDE terminal, run the command git remote add upstream <HTTPS_URL_OF_ORIGINAL_REPOSITORY>.
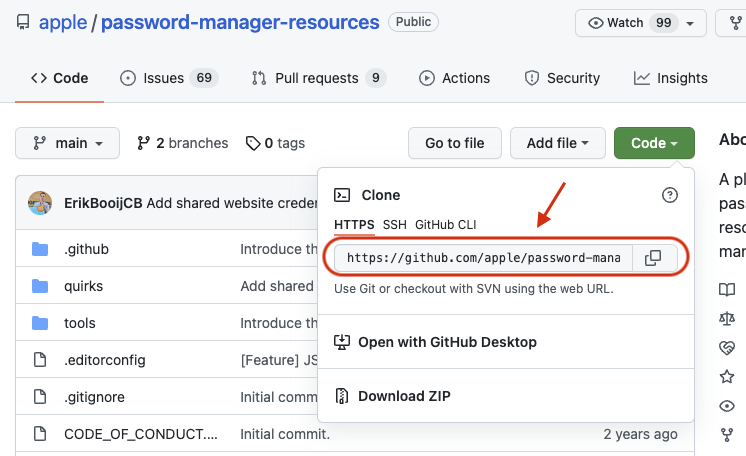
Step 6: Pull the latest changes from upstream into your local repository
Before you start adding any contribution to your local repository, make sure you synchronize your local files with the upstream project repository. The reason is that while you are working on your contribution, the creators or other contributors might also be working on their contributions or adding updates to the original packages, and it might cause some problems if you don't have the latest version of the project repository in your local files.
To get the latest version of the project repository (including any latest changes), use the terminal command git pull upstream <DEFAULT_BRANCH>. In my case, I am using git pull upstream main.

Here you can see that there are no changes since I made my clone request, in the case that there are new changes, they will automatically be merged into your local files.
Step 7: Create a new branch and give it a good name
It is considered best practice to make all your changes on your own branch since it creates a separate working environment apart from the default (main) branch. Create your own branch using the command line git checkout -b <branch_name>, this will automatically switch your environment over to the new created branch. TIP: You should name your branch so that other people looking at your branch name will know what you are working on (This tip is important for dealing with changes on a project that have multiple maintainers such as when you get your job, your coworkers will appreciate this!).

Step 8: Add your changes, commit, and push to your forked repository
In this step, you can now freely make changes (maybe to the README.md or fix an existing issue). Here, I am adding a password rule for zara.com to password-rules.json. Make sure you stage your changes (with git add or git add -A) and commit (using git commit <commit_message>) like in the picture below before pushing (with git push origin <branch_name>). Don't forget to write a good commit message, try to be specific (What did you change/add/fix?).

Step 9: Open a new pull request under the repository you want to contribute to
As you can see in the picture in step 8, git will provide you a link where you can directly go a page with a pull request already created for you.
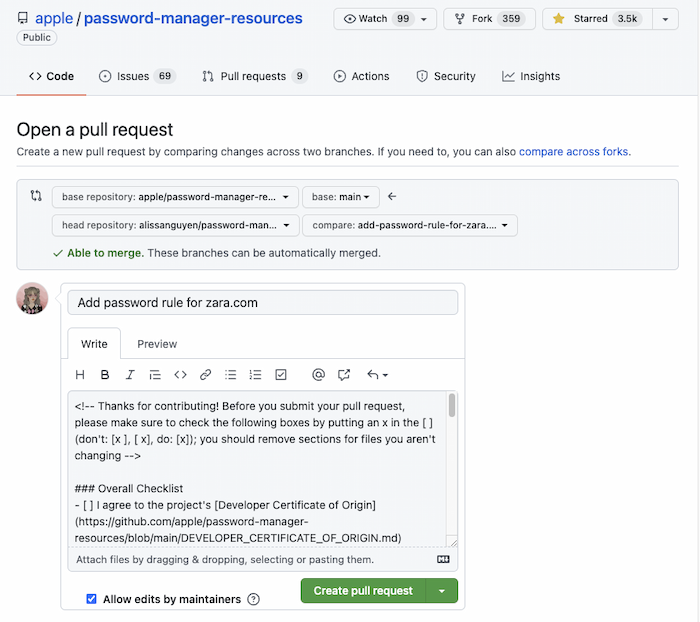
Another more common way is to go to your forked repository on GitHub and you will see a new section where Git will notify you that a new change has been made to this project along with the Compare & pull request button. Click on the button and it will also lead you to the same page as above.

When opening a pull request, you are asking that the project maintainers "pull" the changes you have made in your forked repository and try out your changes. This is, in my opinion a dated term. Calling it a "merge request" makes more sense, and is indeed how GitLab (an alternative to GitHub) calls it.
Step 10: Write an easy to understand pull request
Now, this step is very important as very often, missing a description in your pull request or not following the original project contributing guidelines will get your request denied or closed. You want to make it as easy as possible for the maintainers of the project to merge your code, so put yourself in their shoes as you write your pull request description. Since the change I am making is for an Apple official repository, they have more strict guidelines to follow as well as a code of conduct (so beware of these before submitting your request‼️).
BIG TIP: You can go to the original repository's pull requests and see resolved pull requests. Look through the most recent requests that were accepted by the project maintainer(s) and follow their format.


Step 11: Review and submit your pull request
After making sure your description satisfies all contribution guidelines, you can go ahead and click Create pull request.
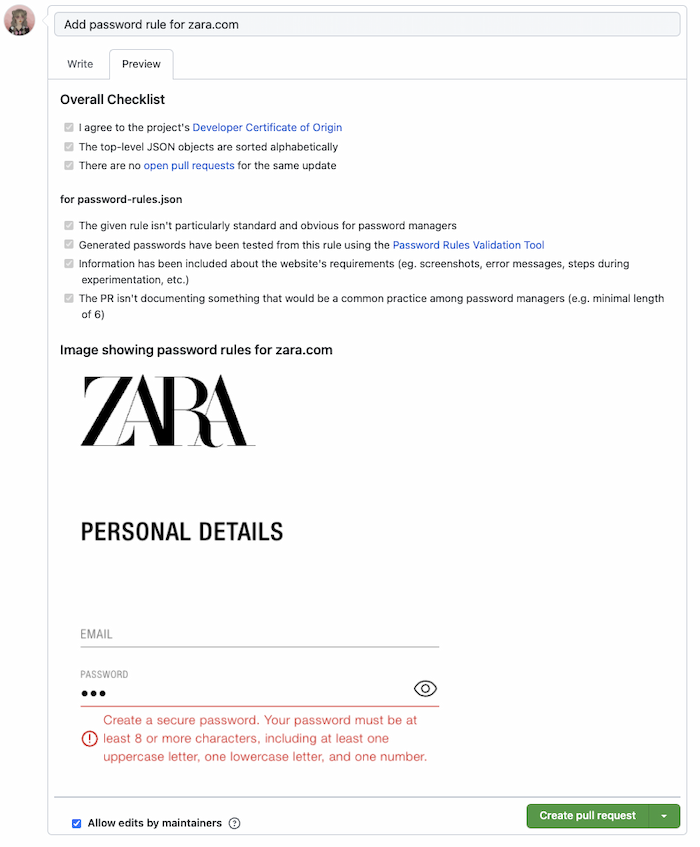
Following your submission, your screen might look something like this:
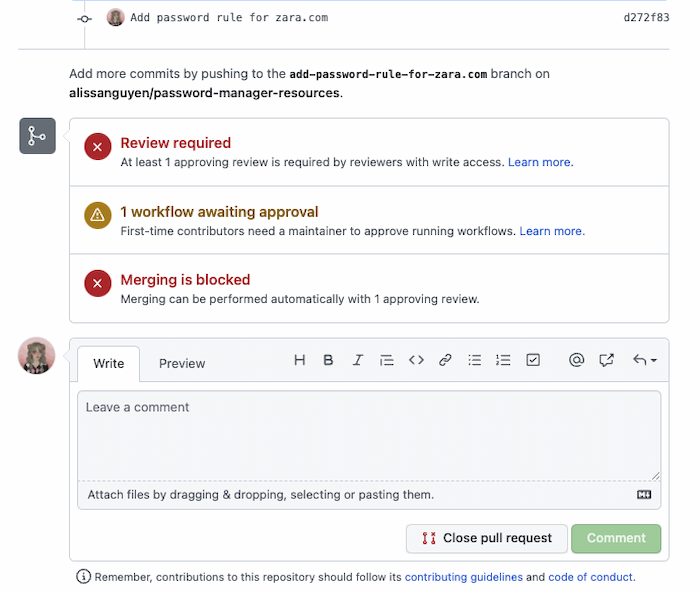
HEY, don't freak out because you see some red messages on the screen. It just means that your request needs to be reviewed before merging into the original project.
This is a good time to go over the Commits and Files changed of your pull request and make sure everything looks good.
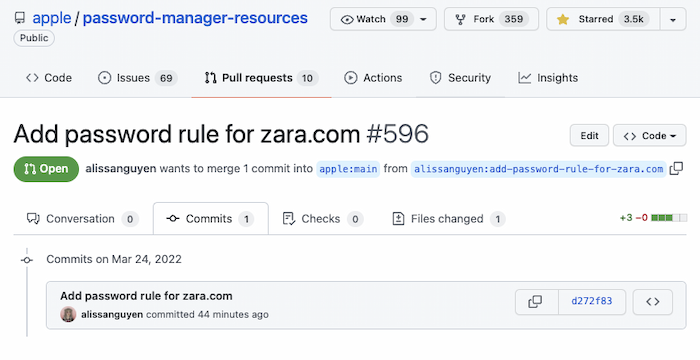
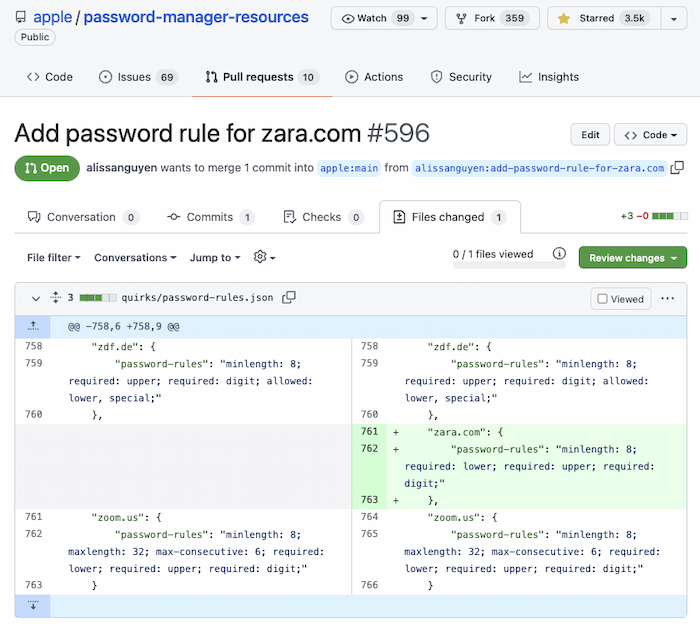
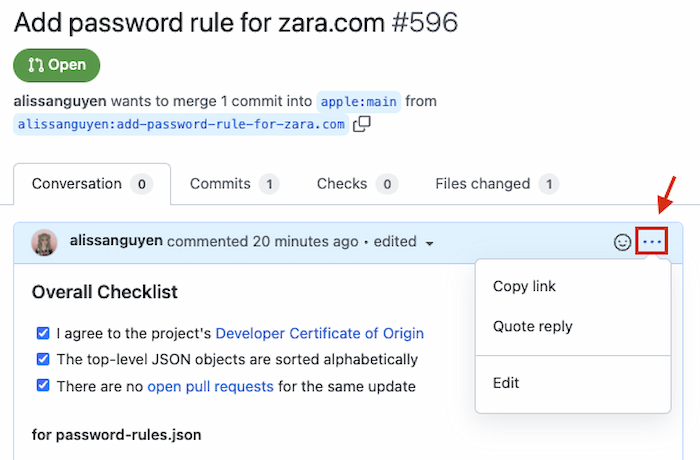
If you need to make changes to your pull request, you can click the 3 dots button in the upper right corner of your request to edit.
Step 12 (Optional): Add more commits to your pull request
While I suggest only contributing one commit at a time, you might need to add more changes to fix the same issue and will need to add more commits to your pull request. Another case is when the project maintainers want you to add more features or modify some of your changes. In this case, you can go back to your local repository, and checkout to the branch which you were working on (For example, if I want to make some changes to the password rule I added earlier, I would git checkout add-password-rule-for-zara.com to switch to that branch. Then, repeat step 8.
After you have pushed your new changes to your forked repository, return to your pull request on GitHub. You will see your new commits there (If not, try refreshing the page).
Step 13 (Optional): Delete your branch and synchronize your forked repository with the original project repository
Now all you have to do is wait for the maintainers to accept your pull request, they will then merge your changes into the project's default branch and close your pull request.
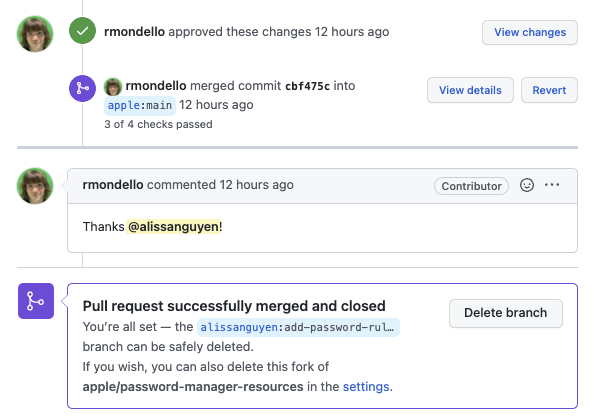
You can now delete your branch from your forked repository by clicking the button Delete branch, it won't affect the original repository so don't worry about that (In fact, if you are worried about that, then it might be helpful to check out this discussion on StackOverflow). The reason is so that next time you want to make a contribution to the same project, you won't accidentally work on the same branch.

After clicking the button, you will see this below message:

Note that this will only delete your branch on your GitHub repository, not your local files which we will be doing next
Next, go to your local repository, and use the following command in your terminal: git checkout <default_branch> to switch over to the default branch. Then, type in git branch -D <name_of_branch_to_delete> to delete the other branch.

After deleting your branch, you can sync your forked repository by git pull upstream <default_branch> in your default branch (You should now only have the default branch(es) without the branch you created for your pull request). This will pull new changes from the original project into your local files.
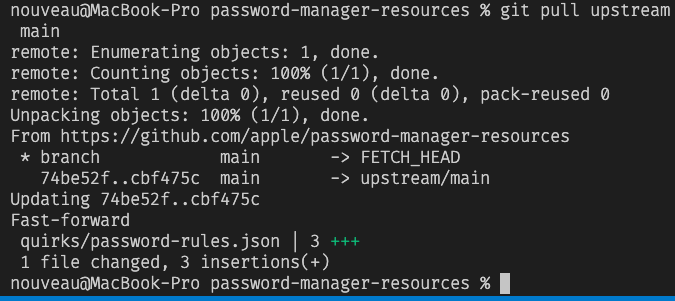
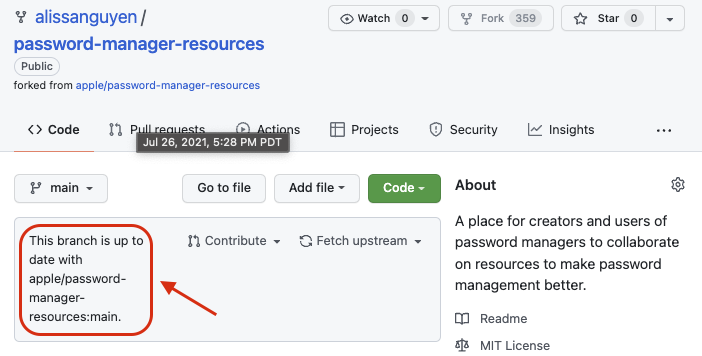
Then, push these changes to your origin (which is your forked repository on GitHub) by using git push origin <default_branch>. After you have done that, you should see a message under your forked repository on GitHub saying that your repository is up-to-date with the original repository.
Yay! You did it ! 🎉
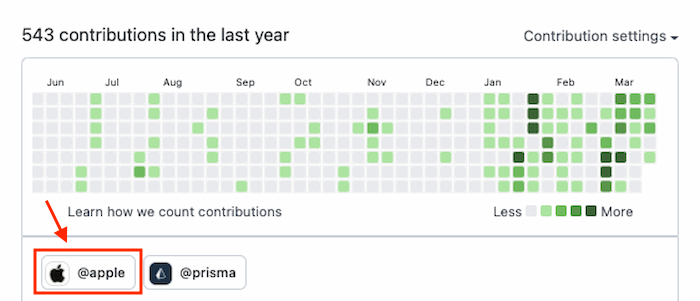
Congratulations on your first open-source contribution! This is a big step towards your future as an active contributor to the Open Source community. Now if you go back to your GitHub profile, you should be able to see your contribution "badge" under your GitHub graph. Try to contribute as much as possible and it will help diversify your portfolio as well as sharpen your skills as a programmer 😁.
Some more tips for contributing...
Here are some tips that might be helpful when you start making more advanced contributions:
Look through a repository's open issues to find issues that you might be able to fix or any that interest you.
If you are contributing to a project and there is no open issue for that, maybe you can be the one filing the new issue 😉.
🚨 Reminder
In case you missed it, I have created this repository on my GitHub that you can use to practice with in case you don't have one in mind yet. I will make sure to give you feedback as well as accept/reject your pull requests so you can get to practice until you are comfortable contributing to a larger open-source repository.

Written by Alissa Nguyen
FollowAlissa Nguyen is a software engineer with main focus is on building better software with latest technologies and frameworks such as Remix, React, and TailwindCSS. She is currently working on some side projects, exploring her hobbies, and living with her two kitties.
Learn more about me
If you found this article helpful.
You will love these ones as well.